How do I use Virtual Hagelin M-209
Here we'll lead you through everything you need to know about how to use the Virtual M-209 simulation. When you first load the simulation and click the "Start Virtual Hagelin M-209" button, you should be greeted with the closed M-209 ready for use.

Looking around
The first thing to learn is how to look around. Simply left-clicking with your mouse anywhere outside of the main M-209 box (i.e. on the table) will allow you to rotate your viewpoint to look around the Virtual M-209. The cursor will show as an arrow when you can move the camera around and a hand pointer when there is something to interact with.
To translate where the camera is pointing (ie move left right or up/down etc), use either the Shift key with the left-mouse button, or the click and drag the right-mouse button if you have one. To zoom in and out, use the third mouse button or roller wheel.
Opening up the case and basic usage
You can open up the M-209 by simply left-clicking anywhere on the green case and you should then be able to see the cipher machine ready to work.
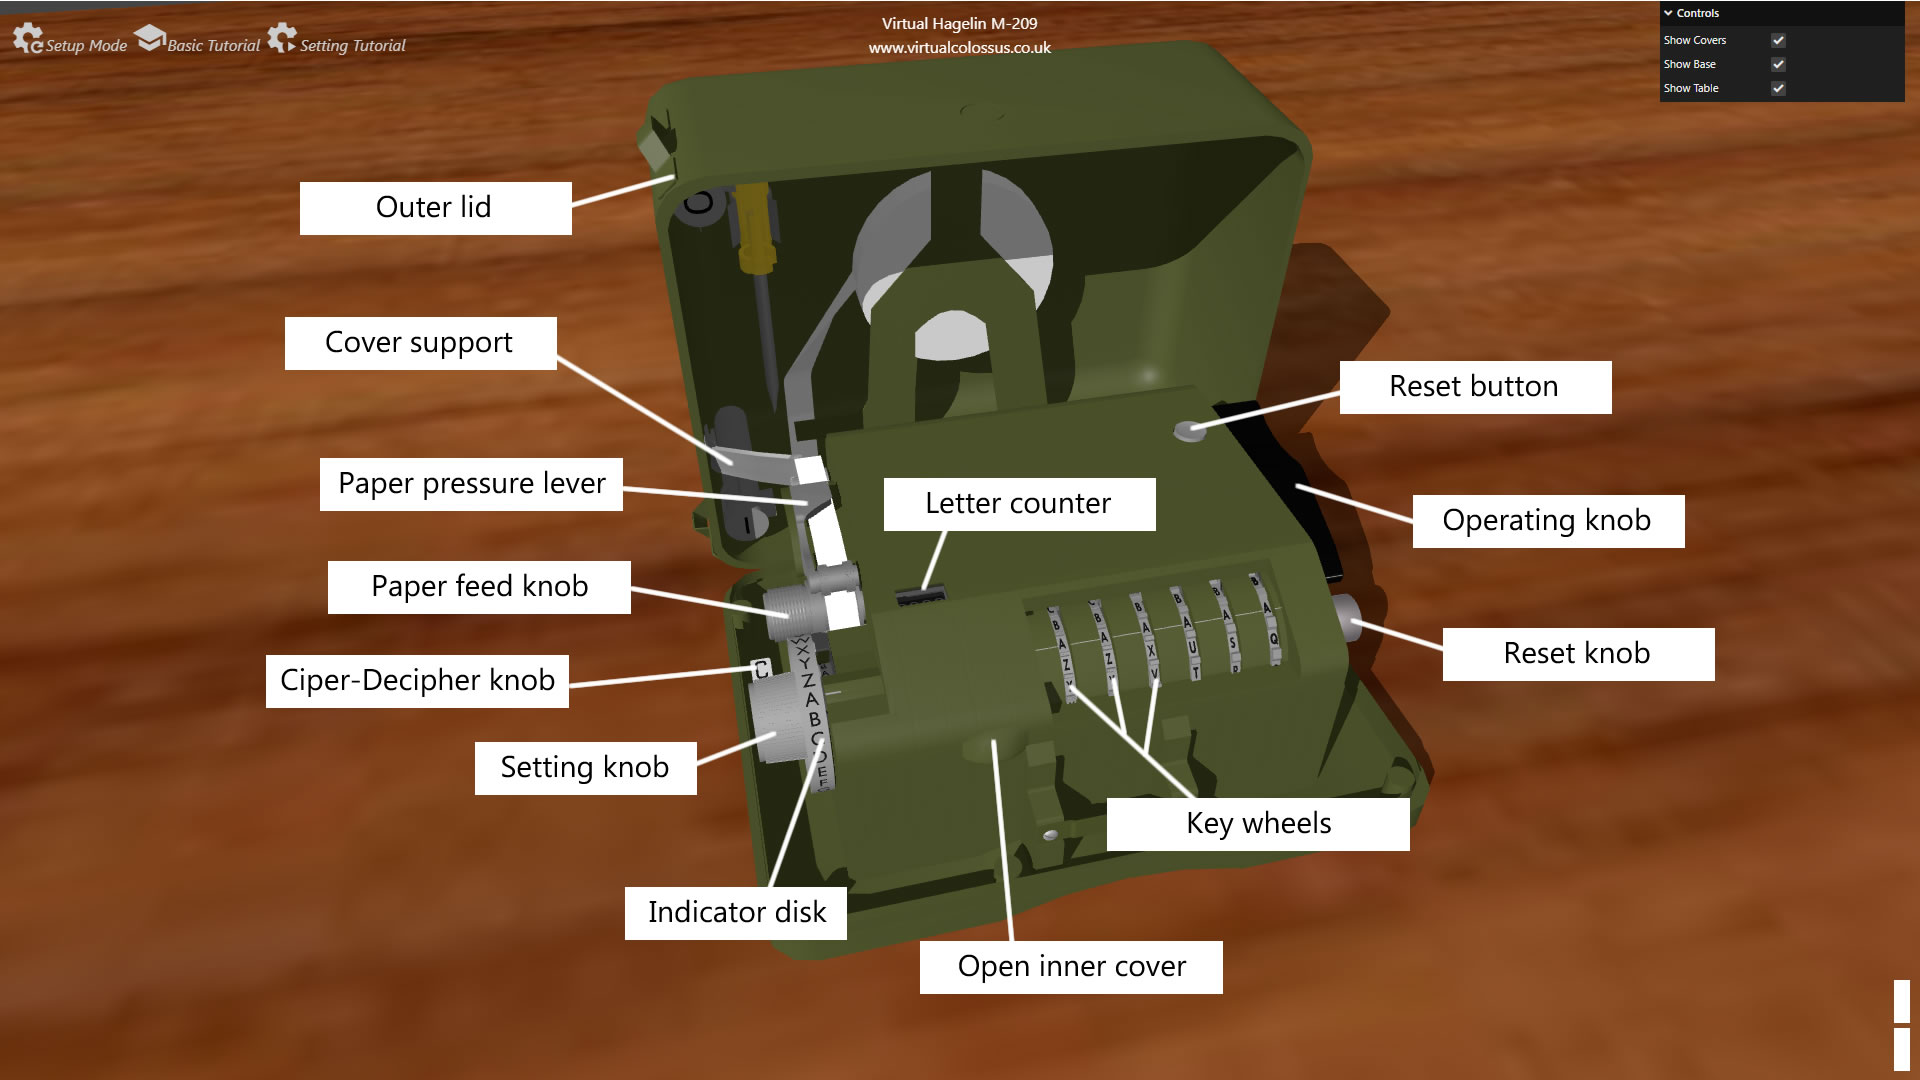
This tutorial is available with helpful pointers on the simulation by clicking on the Basic Tutorial button
The letter you want to encipher is set by turning the settings knob. It's the grey knob on the front-left of the machine with the indicator disk showing the letters of the alphabet. Click and drag up/down to set the letter you want adjacent to the indicator line.
To actually get the machine to encipher the letter and print, you use the black operating handle on the right of the machine. It needs to be turned a full 360 degrees around and will click and stop once done. Note, that you just need to click on this handle to get the simulation to run a single character. Alternatively, you can press the Space bar to operate this handle.
Note how the mechanism moved the indicating disk on several steps and therefore changed the cipher letter being printed. For security, the drive knob is locked at the end of each operating cycle. The indicating disk must always be moved before another letter can be enciphered. If you want to use the same letter, change the rotor one step then back to the same letter.
If you look on the top of the inner cover, you'll see the letter counter which shows how many letters you have currently entered. It should be set back to 0000 before starting to encipher or decipher so you can know how many characters of your message you have currently completed.
To reset the letter counter (and the key wheels), you first need to press the reset button. This is the silver button on top of the inner cover at the back-left. On the real machine, you would hold down this button and then rotate the reset knob to reverse the key wheels until you were back to 0000 on the counter. To make this easier on the simulation, simply left-clicking once on the button will hold it down for you until a second click releases it. Once held down, left-click and drag up/down on the reset knob until the letter counter shows zero.
Before starting a message, the six Key wheels need setting to the desired key. Each wheel has a different number of letters around its circumferance and can be set by clicking and dragging up or down. Try setting the wheels to the letters QAHNKE for example.
This lever on the left side marked C/D changes the M-209 between Cipher and Decipher mode. In cipher mode, the letters on the tape are printed in 5 letter groups, but if this lever is changed to the side showing D for decipher, it prints without the grouping & also changes the letter Z to a space. Try enciphering more than 5 letters in Cipher mode to see the grouping. As a short-cut, you can also just type A-Z on your keyboard which will automatically set the indicator wheel, then turn the handle. Click on the Cipher/Decipher lever to change it`s function.
The paper feed knob allows you to feed the paper tape to view more of the message or to remove it from the machine. Just click on the paper feed knob to rotate it one space.
Clicking on the top paper pressure lever is normally used when inserting the tape and also has a tear-off edge. In this simulation, clicking on this lever will remove the printed tape leaving you a blank new section.
If you wish to close the top outer cover, you just need to click on the cover support (the silver bar on the back-left between the inner case and the outer case).
Setting the inner key

This tutorial is available with helpful pointers on the simulation by clicking on the Setting Tutorial button
The Internal Key of the Hagelin M-209 was reset on a regular basis. This tutorial will take you through an example of setting the key for this machine. Firstly, we need to open the outer lid (click on it) then also open the inner lid to access the mechanism. There is a raised section at the front-left of the inner lid to allow you to do this.
You can also click on the Setup Mode option at the top of the screen which will open up the case, move you closer and also give you an example settings sheet to work through
There are two internal setting mechanisms on the M-209. The first is a set of pins arranged next to each letter on the front rotors. These can be pushed through to the left or to the right (in reality using the screwdriver tool supplied which is stored in the lid).
Setting the pin to the left position means the pin is Inactive while to the right is the Active position. Note that one row is highlighted in Setup or Tutorial Mode to make it easier to see which is the current one to set.
To change the Active/Inactive setting on any pin, simply left-click it which will switch to the alternate position.
On the drum (sometimes called the squirrel cage by the operators) at the rear of the machine are 27 bars. Each one has two lugs which can be slid left/right into one of 6 different active positions (indicated 1-6) or 2 inactive ones (indicated 0). The lugs need to be pulled forwards away from the bar to release the catch and can then be move to a new hole position.
Left-click then drag left/right on a few of the lugs and drag them to a new setting to test this.
Before we begin setting the daily key, it makes it easier if we "zeroise" the mechanism. This means moving all of the pins to the left (Inactive) and setting all of the lugs to their 0 position. You can either do this manually, or if you prefer, click the "Zeroise" option on the right of the screen which will do this reset quickly for you.
On the setting sheet at the left of the screen are the new values we need to set on the pins and lugs. Looking at the left-hand table first, it is setup with 27 rows.
The lug settings are shown first (3-6) then the columns of letters and dashes representing the six key wheels from left to right. Where a letter appears, move the pin to the active (right) position, for a dash leave at the left (inactive) position.
Set the pins on the A row. You need to set wheel 1, 2, 3 and 6 to active (to the right).
Once you've set the pins correctly, you need to set the lugs on the first bar. To make it easier, the lugs to set are duplicated on the right-hand table. For the first row, it wants us to set the first lug to position 3 and the second to position 6. Click and drag the lugs on the highlighted bar to the 3 and 6 positions.
                    --------------------------  ---------------------
                    NR LUGS  1  2  3  4  5  6   BAR 1  2  3  4  5  6
                    --------------------------  ---------------------
                    01 3-6   A  A  A  -  -  A   01  -  -  X  -  -  X
                    02 0-6   B  -  B  -  B  B   02  -  -  -  -  -  X
                    03 1-6   -  -  -  C  -  -   03  X  -  -  -  -  X
                    04 1-5   D  D  -  -  D  D   04  X  -  -  -  X  -
                    05 4-5   -  E  -  E  E  -   05  -  -  -  X  X  -
                    06 0-4   -  -  -  F  F  -   06  -  -  -  X  -  -
                    07 0-4   -  G  G  -  -  -   07  -  -  -  X  -  -
                    08 0-4   H  -  H  H  H  H   08  -  -  -  X  -  -
                    09 0-4   I  -  -  I  I  -   09  -  -  -  X  -  -
                    10 2-0   -  J  J  -  -  -   10  -  X  -  -  -  -
                    11 2-0   K  K  -  -  -  K   11  -  X  -  -  -  -
                    12 2-0   -  L  L  -  -  -   12  -  X  -  -  -  -
                    13 2-0   M  -  M  M  M  -   13  -  X  -  -  -  -
                    14 2-0   N  -  N  N  N  N   14  -  X  -  -  -  -
                    15 2-0   -  O  -  -  -  O   15  -  X  -  -  -  -
                    16 2-0   -  -  -  P  P  -   16  -  X  -  -  -  -
                    17 2-0   -  -  -  -  -  Q   17  -  X  -  -  -  -
                    18 2-0   -  R  R  -  -      18  -  X  -  -  -  -
                    19 2-0   S  S  S  S  S      19  -  X  -  -  -  -
                    20 2-5   T  -  T  T         20  -  X  -  -  X  -
                    21 2-5   -  U  U  U         21  -  X  -  -  X  -
                    22 0-5   V  -  -            22  -  -  -  -  X  -
                    23 0-5   W  X  X            23  -  -  -  -  X  -
                    24 0-5   -  -               24  -  -  -  -  X  -
                    25 0-5   -  -               25  -  -  -  -  X  -
                    26 0-5   -                  26  -  -  -  -  X  -
                    27 0-5                      27  -  -  -  -  X  -
Now we need to move to the next row down, the B wheel row. The `Next Position` option on the right-hand side of the screen will move both the wheels and the drum forward one step and highlight the next ones to set.
Now, we can set the pins for the B row. The sheet shows us to set active the pins on wheels 1, 3, 5 and 6. Set those pins on the B row.
For the lugs on bar 2, there is only one X showing on the right-hand table and the lugs setting is shown as 0-6. This means we leave the first lug on it`s inactive 0 setting and move the second lug to position 6. Set the second bar's lugs to 0 and 6 positions
Continue the settings for each of the 27 rows. Note that the last wheels have less positions than the first so the number of pins to set reduces once you get past Q.
If you want to set everything automatically, press the `Auto Set` option, if you`d like to restart, press the `Restart` option. Complete all of the settings, either manually or by pressing Auto Set.
Well done, you have completed the internal setup of the M-209.
An enciphered string of letter A is used to test the settings. Compare to the string at the bottom of the page. Encipher letter A (or press the A key) 26 times. Make sure you get TNJUW AUQTK CZKNU TOTBC WARMI O printed as your output. This confirms you have the correct settings on your internal setup. If you don't get this exactly as shown, start again with the settings sheet checking that you set each of the pins and lugs correctly.
Example of enciphering a message
The External Message Indicator
Once the machine setup is completed, we can start enciphering a message. First, we reset the counter, on the simulator, press down the Reset button (on the top left of the machine) then use the Reset knob (click and drag up/down) to reset the indicator back to 0000. Next, set the Cipher-Decipher switch in Cipher position (C).
Next, we set six completely random letters on the six wheels. This is called the External Message Indicator. Write down these six letters for later use. For security reasons, it is important that we use a random Message Indicator only once with the machine setting that particular day. Each external Message Indicator must be unique!
Let use take DUFLJB as External Message Indicator.
Click and drag on each pin-wheel to move the letter show to the correct letter.
Next, we select a random letter, say K. Also write down this letter. We now encipher 12 times that letter K.
You can either set the indicator disk to K each time then click the Operating knob, or alternatively, just type the letter K on your keyboard. The result is 12 random cipher letters. The operator would now remove the tape with these 12 letters and reset the counter to zero.
The result should be: PEQGB JGCDF UP
The Internal Message Indicator
These 12 letters are used to set the secret Internal Message Indicator. We start with the first letter, and set the extreme left-hand wheel in that position. We proceed through the wheels from left to right. Since some letters are omitted on some wheels, it is possible that the given letter is not on the wheel. In that case, we strike-through that letter and take the next one.
If these 12 letters are not enough to compose the Internal Message Indicator, due to many strike throughs, you must select another External Message Indicator and start all over. If all wheels are set, we are ready to encipher the message with this Internal Message Indicator.
Our Internal Message Indicator, obtained from the 12 letters: PEQGBJ
Enciphering the message
Now, we can encipher our message, with the Cipher/Decipher switch still in Cipher position. During enciphering, spaces between words should be replaced by the letter Z. When the receiver deciphers your message, each letter Z is replaced by a blank space. Separate letter are replaced by their phonetic words, C to CHARLIE, or E to EASY etc. Numbers are spelled, 1 as ONE, 2 as TWO etc.
The message:
OPERATION ZEBRA STARTS AT SUNSET
The cipher message:
KBMUN ODDDC YWLVM RBVUS QYRHT XNZUI HX
Once the message is enciphered completely, we have the cipher text printed in groups of five letters on the paper tape. If the last group has less than five letters, we complete it by writing the letter X until a group of five is formed. (Don't encipher the letter Xs, just write them in!).
Our message: KBMUN ODDDC YWLVM RBVUS QYRHT XNZUI HXXXX
To complete the message, we need to add three indicators. These are added both before and after the message. The first indicator is called the System Indicator, telling the receiving operator that the message is enciphered with the M-209. This is the originally enciphered letter we wrote down, twice, that is KK.
The second indicator is the randomly selected External Message Indicator we wrote down (not the secret Internal Message Indicator!). This is written just after the first System Indicator. If you recall, it's DUFLJB
The third indicator is the Key List Indicator, telling the receiving operator which key sheet was used to encipher the message. Let's say that our Key List we're using is XA. The Key List Indicator is written down just after the External message Indicator. We now have the complete message, including indicators:
KK DUFLJB XA KBMUN ODDDC YWLVM RBVUS QYRHT XNZUI HXXXX KK DUFLJB XA
Finally, the message is rewritten in groups of five characters:
KKDUF LJBXA KBMUN ODDDC YWLVM RBVUS QYRHT XNZUI HXXXX KKDUF LJBXA
We now destroy the paper with the 12 letters and turn the wheels to a random position to break up the Internal Message Indicator.
Deciphering the message
To decipher the message, the receiving operator sets the Cipher-Decipher switch in the Cipher position (not the Decipher position!). Just like the sender did, he sets the six wheels according to the External Message indicator that was added to the message (DUFLJB), enciphers 12 times the letter K that he found at the start and the end of the message, and thus retrieves the 12 letters to compose the Internal Message Indicator.
Now, reset the counter back to 0000, set the pin-wheels according to the retrieved Internal Message Indicator (PEQGBJ), now turn the Cipher-Decipher switch to the Decipher (D) position and decipher the message. When deciphering, the deciphered letter Z is replaced by a space. On places where the missing Z in a word is obvious, we write down the letter Z, as in the word ZEBRA.
OPERATION EBRA STARTS AT SUNSET
OPERATION ZEBRA STARTS AT SUNSET
You now have learned the complete procedure to send messages with the M-209 Cipher Machine!
The next message was enciphered with the same machine settings from the example key sheet. It’s up to you to decipher this message. Good Luck!
SSCVQ IMKXA SISMR TRNLE POFCW
LWKUW AJWGL SUUAE NZANO TZARZ
VRBVN ZDKEB JGPUI WXXXX SSCVQ
IMKXA
* This last example is based on the one in the excellent Windows M-209 simulation by D. Rijmenants (https://www.ciphermachinesandcryptology.com/en/m209sim.htm)